- Start the DAQ system
- Run a uniformity scan
- Run in manual mode (DAQ CONTROL)
- Get the detector ready for a global run
- Change the CDH version in DATE
Start the DAQ system
Click on the DateHI icon which is the button at the top left of the screen of the PCs in the ACR. After the application has been launched 3 windows are displayed:
1. The Detector Control Agent – DCA
2. The main ECS window
3. The infoBrowser
These panels allow to configure the detector for data taking.
The DCA panel allows to gain control of the detector and to work on the acquisition system (i.e. chose the kind of run).
The experiment control system (ECS) panel allows to check the read-out status and to configure the data acquisition system (i.e.: equipment selection)
Through the Info Browser panel it is possible to check the state of the run and to publish and read an error list in case any fault should occur.
| OLD LDC/GDC NAME | PC NAME | EQUIPMENTS |
|---|---|---|
| ldc-SPD-01-03-0 | aldaqpc163 | 0 - 1 - 2 |
| ldc-SPD-04-05-0 | aldaqpc164 | 3 - 4 |
| ldc-SPD-06-08-0 | aldaqpc165 | 5 - 6 - 7 |
| ldc-SPD-09-10-0 | aldaqpc166 | 8 - 9 |
| ldc-SPD-11-13-0 | aldaqpc167 | 10 - 11 - 12 |
| ldc-SPD-14-15-0 | aldaqpc168 | 13 - 14 |
| ldc-SPD-16-18-0 | aldaqpc169 | 15 - 16 - 17 |
| ldc-SPD-19-20-0 | aldaqpc195 | 18 - 19 |
| gdc-DET-SPD-0 | aldaqpc211 |
| NEW LDC/GDC NAME | PC NAME | EQUIPMENTS |
|---|---|---|
| ldc-SPD-0 | aldaqpc001 | 0 - 1 - 2 |
| ldc-SPD-1 | aldaqpc002 | 3 - 4 - 5 |
| ldc-SPD-2 | aldaqpc003 | 6 - 7 - 8 |
| ldc-SPD-3 | aldaqpc004 | 9 - 10 - 11 |
| ldc-SPD-4 | aldaqpc005 | 12 - 13 - 14 |
| ldc-SPD-5 | aldaqpc006 | 15 - 16 - 17 |
| ldc-SPD-6 | aldaqpc007 | 18 - 19 |
Run a uniformity scan
- From the Detector Control Agent launch a DAQ_UNIFORMITY_SCAN (if you want to save the run, make sure that the GDC is in mStream recording)
- Go to the User Interface on the spdFEElectronics -> General scan; go to the tab Uniformity scan
- Select the number of rows to pulse (0-255 means the full chip) and the number of triggers to send (usually 100)
- Press start and check the log; at the end of the scan you can close the run from the DCA.
Run in manual mode (DAQ CONTROL)
Before starting the run procedure look up the pages about the instructions written by Costanza regarding how to configure the Pixel trigger.
If all the half-staves of one router are switched off, make sure that you have followed the procedure to exclude the router from the data taking, explained here.
How to start a run
- Start the DAQ system.
- Gain control of the detector from the DCA panel (see chapter “Gain control of the detector”).
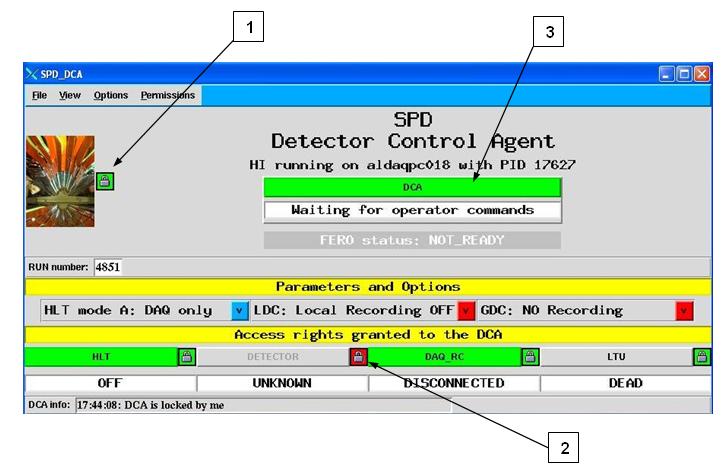
Figure 15: DCA panel
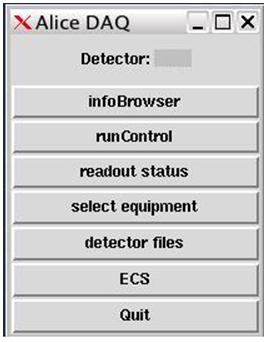
Figure 16: Main ECS panel
- Click “select equipment” on the main DCS panel; a panel will open on which it is possible to chose the routers to include in the run according to the detector status. After having carried out this operation click “commit”.
- Click View on the DCA panel and select “show DAQ control” from the pull-down menu. The following panel will be displayed (fig. 17).
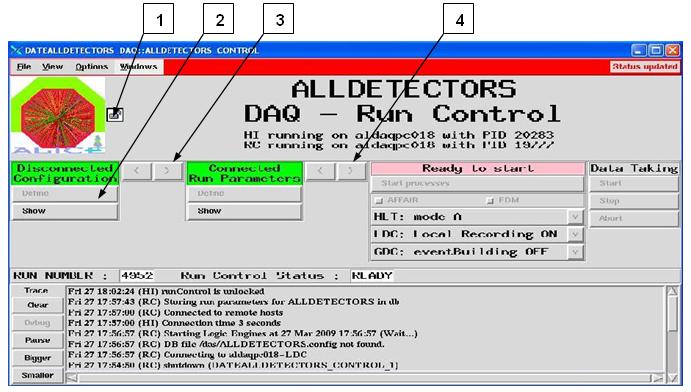
Figure 17: DAQ control panel
- If the padlock is open (fig17, n.1) click on it in order to gain control; the padlock will close and turn green.
- Click “Define” (Fig. 17, n.2) and select the LDC (normally all of them are active).
- Click on the arrow marked by n. 3 in figure 17 in order to open 2 panels (fig. 18) through which users can check the run status (running, number of hits...).
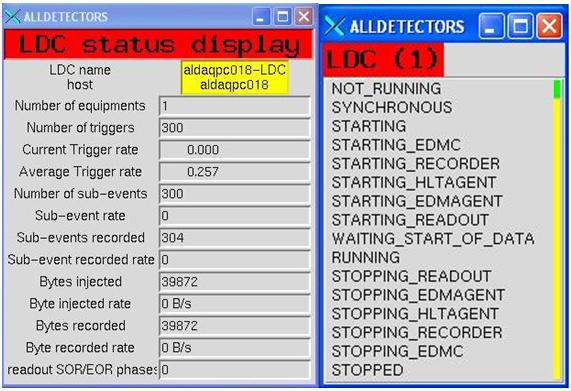
Figure 18: LTU panels
- Click on the arrow marked by n. 4 in figure 17.
- Make sure that the padlocks displayed on the DCA panel are green, then click on the “DCA” button (fig. 15, n. 3) and select the kind of run to be started.
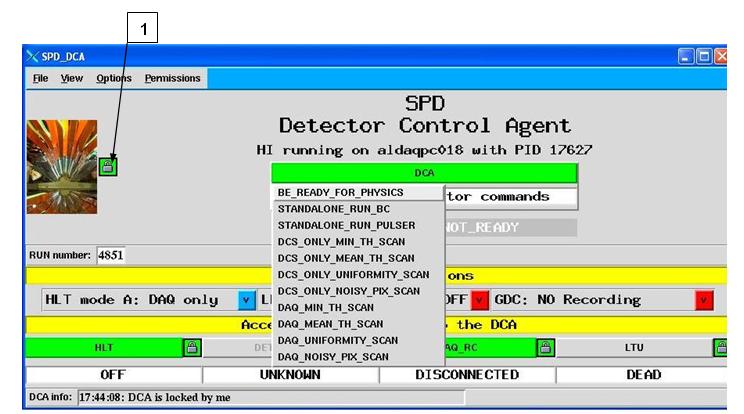
Figure 19: Run list
- Carefully follow the instructions to run in stand-alone mode until the second-last one (Click on the arrow marked by n. 4 in figure 17).
- Release the control of the detector to the general DAQ system. To release control users need to work on two panels, the one in fig. 17 and the one in fig. 19. First click on the padlock on the DAQ control panel (fig. 17, n.1) and select release DAQ control”. Then click on the padlock on the DCA panel (Fig. 19, n.1) and select “release DCA control”. The detector is free.
- Now users are no longer in control of the detector.
- Let the DAQ shifter know that SPD can be included in the global run.
Change the CDH version in DATE
- Do and ssh into the LDC machines, go to /date/db
- Open ./daqDetDB_browser, a window with SPD CDHV opens
- Select the CDHV file and check the Size version, if it is 2 then DATE wants the CDH v.2, if it is empty DATE wants the CDH v.3